1) Introduction
Lead Source Tracking helps you attribute incoming leads to the specific channels where you deploy your Spark360 widget experience. Instead of treating all traffic as one stream, you can see which source is producing each lead and use that visibility to improve campaign performance. Spark360 captures source attribution at the moment a lead arrives and preserves that attribution historically. This means your reporting stays accurate over time, even if you later rename or reorganize your sources. Each widget supports up to 10 active custom sources.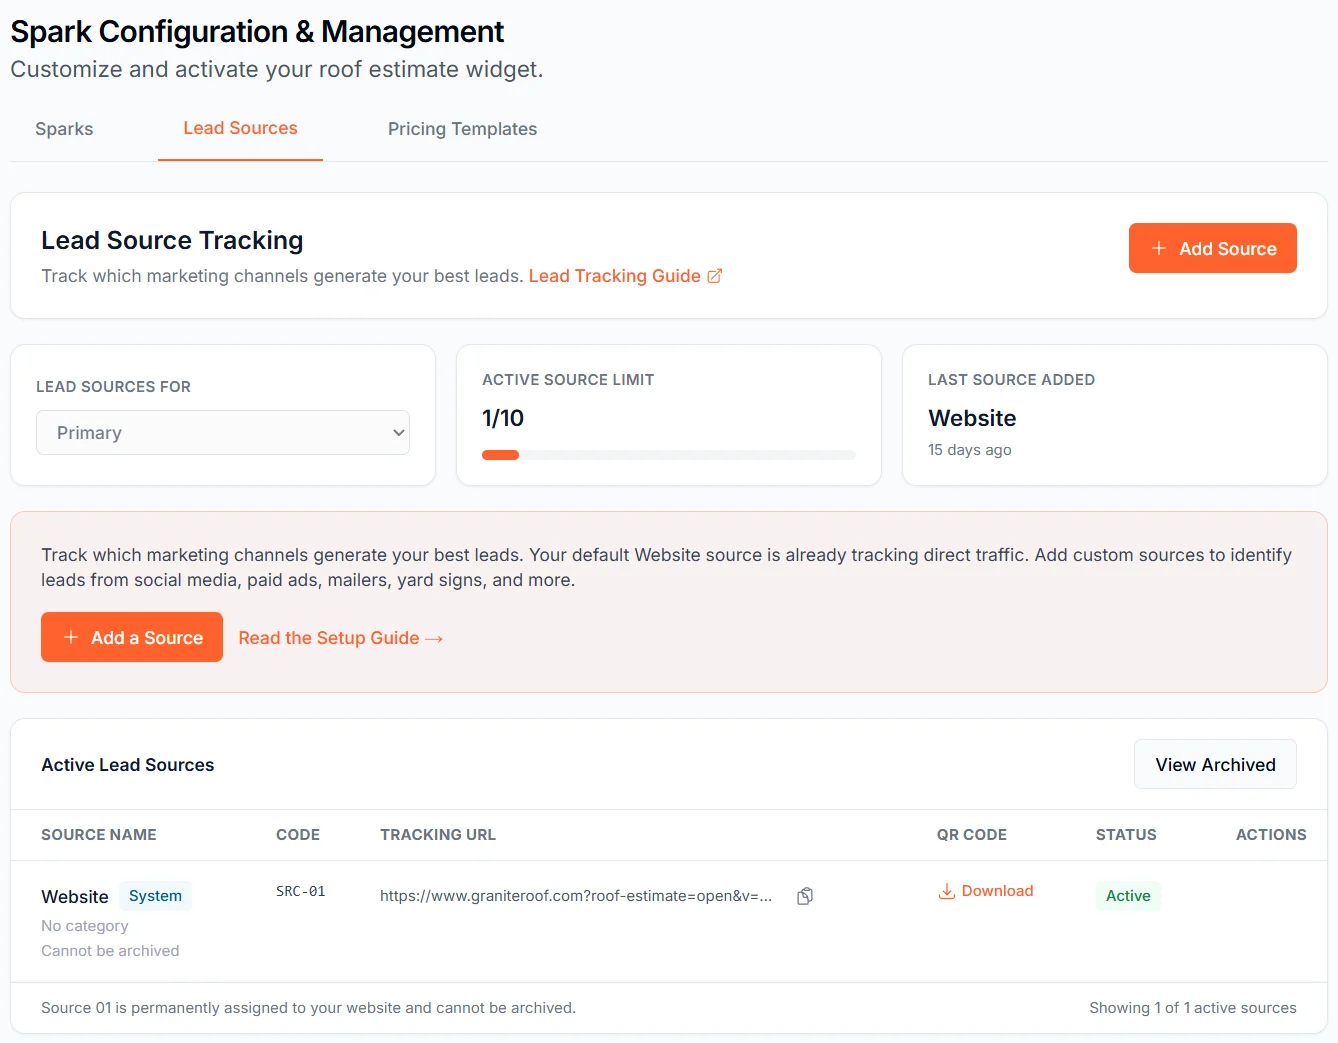
2) How it works
Each Spark360 subscriber configures one or more widgets for their website. Lead Source Tracking lets each widget capture leads from multiple sources by using tracking URL parameters (?v= and ?s=) that identify source context.
When a lead arrives, Spark360 records the source used for that submission and stores it with the lead.
3) The system source (SRC-01)
Every subscriber starts with one built-in source named Website. This is the system source and its Source Code is SRC-01. It captures leads that arrive without specific tracking parameters, such as direct visits, organic search clicks, or other untagged traffic.The system source is immutable: SRC-01 cannot be archived or renamed.
4) Choosing which widget to manage
If you have multiple widgets configured (number of widgets available depends on your subscription tier), the Lead Sources For card at the top left of the Lead Sources tab lets you select which widget’s sources you’re managing.- The dropdown defaults to your Primary widget when you first arrive on the tab
- Selecting a different widget loads that widget’s source list, including its system Website source and any custom sources you’ve created for it
- Each widget has its own independent set of sources — adding or archiving a source for one widget does not affect another widget’s sources
- Archived widgets and widgets that are not yet configured do not appear in the dropdown
Switching widgets in the dropdown updates the URL in your browser. You can bookmark or share a link directly to a specific widget’s Lead Sources view.
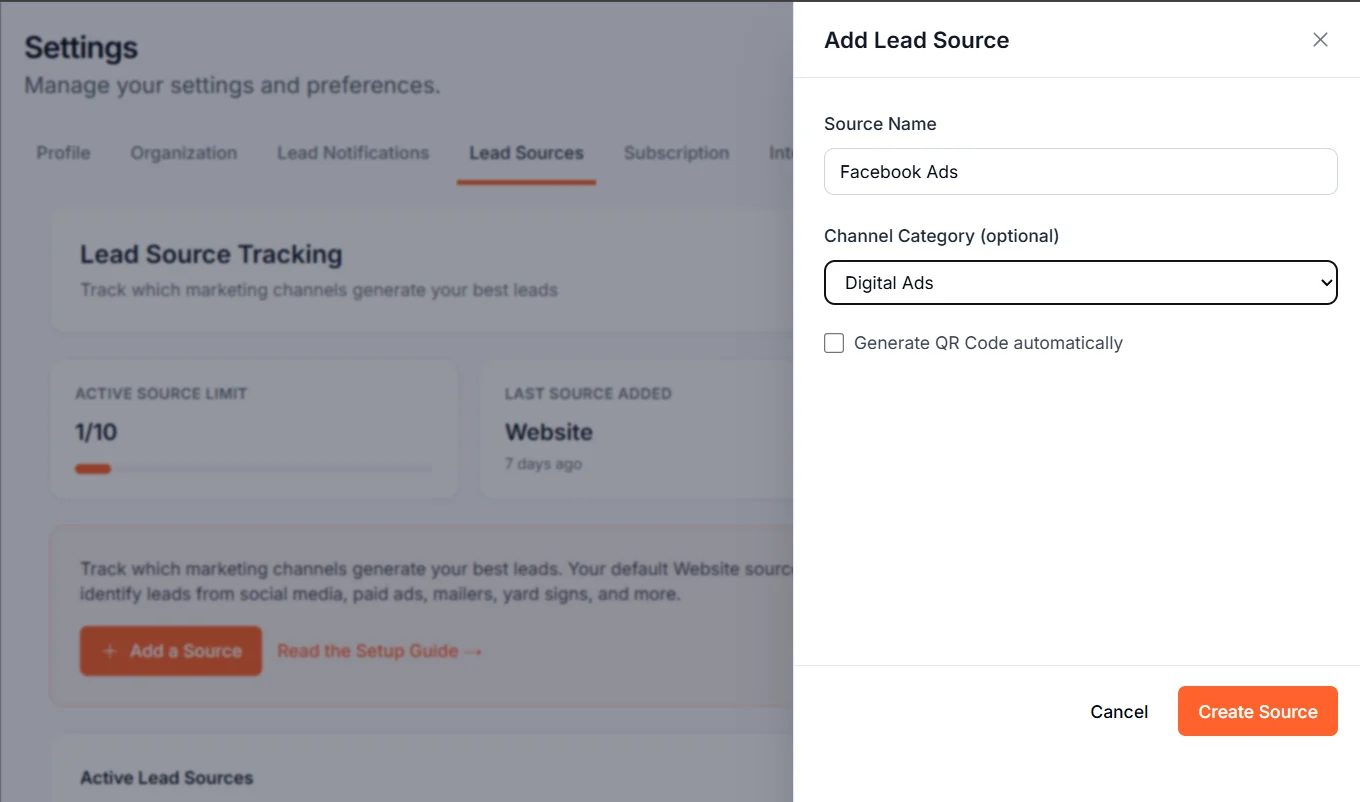
5) Creating a custom source
Use the following walkthrough to create a custom source named Facebook Ads.Open Lead Sources
In your Spark360 dashboard, click Manage My SPARK in the left sidebar, then click the Lead Sources tab.
Click Add Source
Click Add Source (top-right button, or the empty-state add action if no custom sources exist yet).
Choose QR Code behavior
Optionally check Generate QR Code automatically. You can skip this and generate a QR Code later.
Confirm it appears in the table
The slide-over closes. Your new custom source appears near the top of the table with a newly assigned Source Code (for example, SRC-02).
Use the generated Tracking URL
Spark360 auto-generates the source-specific Tracking URL and displays it in the Tracking URL column.
6) Using your tracking URL
Each source has a Tracking URL shown in the Tracking URL column. The URL includes parameters that identify the source, such as?roof-estimate=open&v=01&s=02.
Use the copy icon to copy the Tracking URL, then deploy it where that source is promoted. Common placements include:
- Facebook Ads destination URLs
- Google Ads destination URLs
- Email signature links
- Sponsored social posts
- Yard signs and billboards (typically through QR Code usage)
- Direct mail QR Codes
7) QR Code creation and download
Each custom source can include an optional QR Code.- You can generate a QR Code during source creation with Generate QR Code automatically.
- You can also generate it later using the Generate button in the QR Code column.
- Once generated, use Download in the QR Code column to save the PNG.
- The QR Code is also accessible from the source’s Edit slide-over.
- Each QR Code encodes the source’s full Tracking URL, so scans launch the widget with the correct source attribution.
- The QR Code uses your organization-specific brand color for visual consistency.
Downloaded QR files follow this format:
<OrgName>-<SourceName>-v<widget_version>-s<source_code>-QR.png (for example, Spark360-Facebook-Ads-v01-s02-QR.png).8) Reading source data on the dashboard
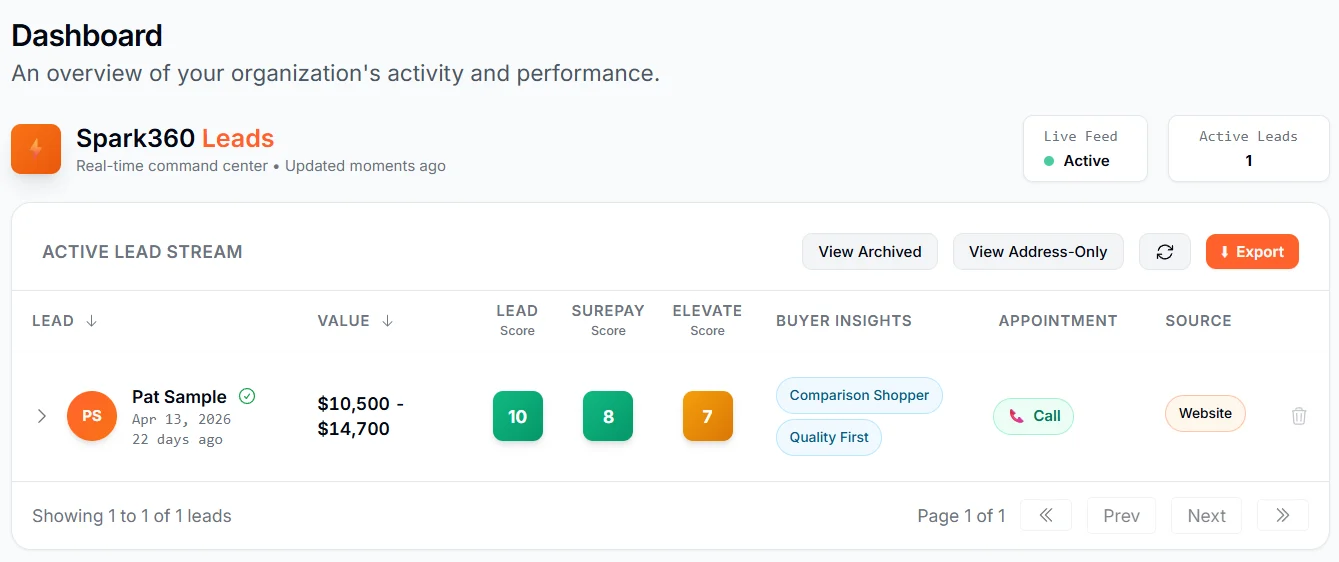
Lead attribution appears directly in the leads experience:- In the Leads table, each lead has a Source pill in the rightmost Source column (for example, Facebook Ads).
- Expanding a lead shows a Lead Source section with widget name, widget version, Source Code, and Source Name captured when that lead arrived.
9) Source attribution in webhook payloads
If you consume outbound lead webhooks, source attribution is included in thesource_tracking object.
widget_versionwidget_namesource_codesource_label
source_label reflects the Source Name captured at lead arrival (snapshot behavior), not a live lookup against current source labels.
For multi-widget organizations, widget_name and widget_version identify which specific widget captured the lead — useful when a single subscriber is running multiple widgets across different domains or campaigns.
For full payload structure, see the Webhook payload reference.
10) Managing sources
Use row actions (ellipsis menu) to manage custom sources over time:- Edit: updates Source Name and Channel Category.
- Archive: moves a source to Archived.
- Restore: returns an archived source to Active.
- Source Code is fixed and cannot be changed.
- Leads already captured under a source retain their original attribution.
- The system source (SRC-01) has no ellipsis menu and cannot be edited or archived.
11) Limits and rules
- Up to 10 active lead sources per widget (includes system SRC-01).
- Source Codes are sequential and never reused.
- Source Names support up to 50 characters.
- Channel Category values come from a predefined dropdown.
- Tracking URLs are auto-generated and cannot be manually edited.
- Source attribution is captured at lead arrival and remains historically preserved.